Wednesday, October 30, 2013

DIY: Spiked Flats


I have noticed flats have been upping their game by adding spikes, jewels and even cat faces (side note I love cats).  With all these additions I have also noticed the prices increasing. You can now pay anywhere from $60 to even more than $100 just for a pair of flats...WHAT?!!!! Ironically flats are the most painful shoe I wear but I will always endure the pain as long as the shoes are fabulous but I wont pay those prices...sorry...not sorry. So this is how I stay on trend but keep money hidden in my mattress...wait I mean in the bank. Complete directions below. If you try this please hashtag me on Instagram @lazyblueorchids. I hope you enjoy.

What I Used
1. Pair of flats (Shoe Boutique $14.99)
2. Some spikes or any kind of decoration you prefer (Bead World in NYC $6.00)
3. E-6000 Glue (Michaels had 50% off coupon. I think I paid $3.00)
Tip: Don't worry about the amount of glue. After glue is completely dry it becomes less visually apparent.
 Directions
Step 1: Make sure shoes are clean of any hair or debris.
Step 2: Create a template for your design on a flat surface.
Step 3: Pour some glue on a piece of cardboard.
Step 4: Use a small paint brush to apply the glue directly to the shoe (Do small sections)
Step 5: Start adding spikes to the glue. I started with the center of my design and worked my way outward.(You can get spikes without holes in them. Mine has holes because I also make jewelry with them).
Step 6: Hold and press spikes into glue while blowing on glue. Do this for about 10 seconds so spikes set in glue.
Step 7: Add additional glue to any area that needs it.
Step 8: Allow to dry over night then enjoy your fabulous flats.
Bye :)

Sunday, October 27, 2013

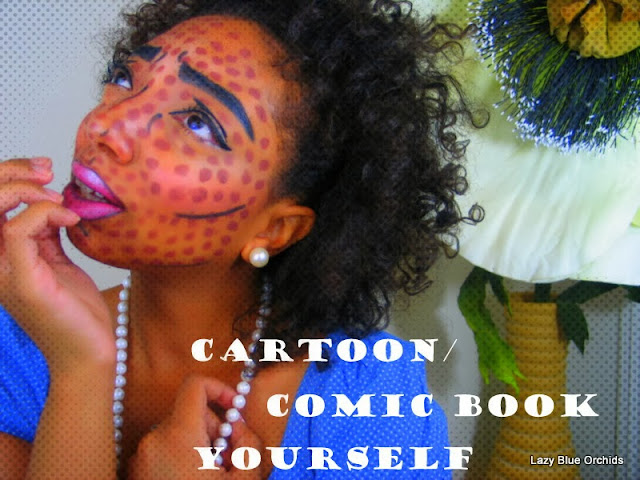
Halloween Costume: Cartoon/Comic Book Yourself

Halloween is here...ish, so I decided to cartoon/comic strip myself!! I don't know about you but my social media feeds are filled with comic strips. Apparently becoming a cartoon/comic strip is the new craze, so I decided to become one in real life...or is it fake life...I don't know whatever. Here is my take on a real life cartoon/comic strip. Complete directions below. HAPPY HALLOWEEN I hope you enjoy!!!! Boo
What I Used
Loreal Bare Natural Powder Foundation: Cocoa 472 (Face)
e.l.f. Complete Coverage Concealer: Warm/Medium (Face)
The Color Workshop: Pink Blush (Cheeks)
The Color Workshop: Blue Eye Shadow (Eyes)
NYC Eyeliner: White 926 (Eyes)
The Color Workshop: White Eye Shadow as a highlighter
Rimmel: Lycra Lash Extender Black 
NYX Matte Lipstick: Tea Rose MLS11 (Lips)
NYX Lip-liner: Sand Pink 856 (Lips)
NYC Lip-liner: Light Brown (Lips)
Stila Liquid Eyeliner: Black (Eyes)
Revlon Beyond Beauty Eye Pencil: Black 12 (Face Contour)
Jordana Lip liner: Nutmeg 11 (Face Dots)
The Color Workshop: White Cream Eye Shadow (Lip Highlighter)

First do normal foundation routine and any highlighting and contouring.
 Tip: Don't worry if dots aren't in perfect circles.
Tip: I only added dots to my face but you can go as far as you want ( it's just more work).

Voila!


 Directions
Step 1: Do your normal make-up routine minus your eyebrows,lips and eyes.
Step 2: Apply dots all over your face. Jordana Lip-liner: Nutmeg 11 (Face Dots)
Step 3: Fill in eyebrows fully. I made mine look like I was sad. Revlon Beyond Beauty Eye Pencil: Black 12 
Step 4: Contour your cheeks, nose, chin and eyes with sharp black lines. Revlon Beyond Beauty Eye Pencil: Black 12 (Face Contour)
Step 5: Add your favorite eye shadow. The Color Workshop: Blue Eye Shadow (Eyes)
Step 6: Add a winged eye line. Stila Liquid Eyeliner: Black (Eyes)
Step 7: Add white eyeliner to your water line. NYC Eyeliner: White 926 (Eyes) 
Step 8: Add your mascara. You can also add false eye lashes (I didn't have any). Rimmel: Lycra Lash Extender Black 
Step 9: Apply your favorite lipstick or lip stain check out how I do mine hereNYX Matte Lipstick: Tea Rose MLS11 (Lips), NYX Lipliner: Sand Pink 856 (Lips), NYC Lipliner: Light Brown (Lips)
Step 10: Line the outer parts of your lips with black liner. Also add some black to the inner part of your top and bottom lip. Revlon Beyond Beauty Eye Pencil: Black 12 
Step 11: Add some white to the corners of your lips to create the illusion of light reflecting off of them. The Color Workshop: White Cream Eye Shadow 
Step 12: Dress how you want...your a cartoon!!!
Bye :)

Friday, October 25, 2013

I See You: Easy Eyeball Nail Design


Halloween is getting close and hopefully you have your costume, if not...get it together!! Even if you don't have your costume you can still do your nails. Here is an easy Halloween nail design for any costume.  Eyes go with everything...they're the new black. Complete directions at the end. Also if you recreate this design feel free to hashtag me on Instagram at #lazyblueorchids. I hope you enjoy!!! 

Nail Polishes I Used
KleenColor: Pink Sleepers(67), KleenColor: White (4), KleenColor: Neon Green (17), KleenColor: Sea Ice (113), KleenColor: Brown (51), KleenColor: Light Red (79), KleenColor: Charcoal (6), Wet N Wild: Wild Shine (401A)
Tools
1. Nail Brushes
2. Nail Dotter (I made mine by putting a nail into an eraser of a pencil...creative lol)
3. 100% Acetone Nail Polish Remover
Tip: Alow nails to dry a minute before applying another coat of nail polish

Tip: Don't worry about getting the circles perfect...nobody's perfect ;)
Tip: When creating the circles use a stippling motion.
Voila 

Directions
Step 1: Paint a thin layer of your base coat on all your nails. KleenColor: Pink Sleepers(67)
Step 2: Paint two thin coats of white on all your nails. KleenColor: White (4)
Step 3: Put the nail polish you will be using for the eye color on a piece of plastic or a palette. I used KleenColor: Neon Green (17), KleenColor: Sea Ice (113), KleenColor: Brown (51) (You can use only one color if you like).
Step 4: Dip your dotting tool in the nail polish and then start to create a circle on your nails by using a stippling motion.
Step 5: Allow them to dry
Step 6: Do the same as Step 4 with you black color except don't create a big circle. KleenColor: Charcoal (6)
Step 7: Put some red nail polish on a piece of plastic or a palette and dip your nail brush into it. Then start to create thin lines on the white parts of your nails. KleenColor: Light Red (79)
Step 8: Follow Step 7 but now add a small white area to the black circles on your nails. This will create the illusion of light reflecting off of the eye. KleenColor: White (4)
Step 9: Apply your top coat.Wet N Wild: Wild Shine (401A) 
Step 10: Scare people!!! ( I only added this step because I wanted it to be an even 10 steps lol)

Bye :)

Monday, October 21, 2013

Pink Top & Polka Dots: OOTD

I am getting pretty excited about Halloween so this OOTD is my final contribution to Pink-tober Breast Cancer Awareness Month. I was feeling a little risky so I put together some different textures and colors...and also stood on active train tracks (very risky). Anyway I hope you enjoy!!!

What I Am Wearing
Pink top: Boutique in Queens New York
Crop Blazer: Forever 21
Polka Dot Pants: Forever 21
Bag: Aldo
Shoes: Steve Madden
Rings: Aldo Accessories 
Bye :)