
It's October!!!! October is about anticipating showing off either your really crafty costumes or your somewhat barely there costumes for Halloween, which in NYC is a big deal (and somewhat scary...not the good kind of scary lol). Halloween can wait until the end of the month because October is also about Breast Cancer Awareness. This is the only month in the fall it's okay to be covered in all different types of pink and everyone understands why you may look like a bottle of Pepto Bismol (does that stuff still exist?). So this week I will contribute my pinkness starting with this cute nail design. All the directions will be at the bottom of this post with tips throughout the pictures. If you decide to recreate this please hashtag me on Instgram @LazyBlueOrchids. I hope you enjoy!

WHAT YOU WILL NEED


Tip: I always start off with a base coat to protect my nails. I usually use a very pale nude color.

Tip: Anytime you use a glitter nail polish make sure to always use a base coat.
Tip: To easily remove glitter nail polish I use 100% Acetone. It's the best (my opinion).


Tip: If you are going to do any kind of nail art you should allow your nails to dry completely before adding art.

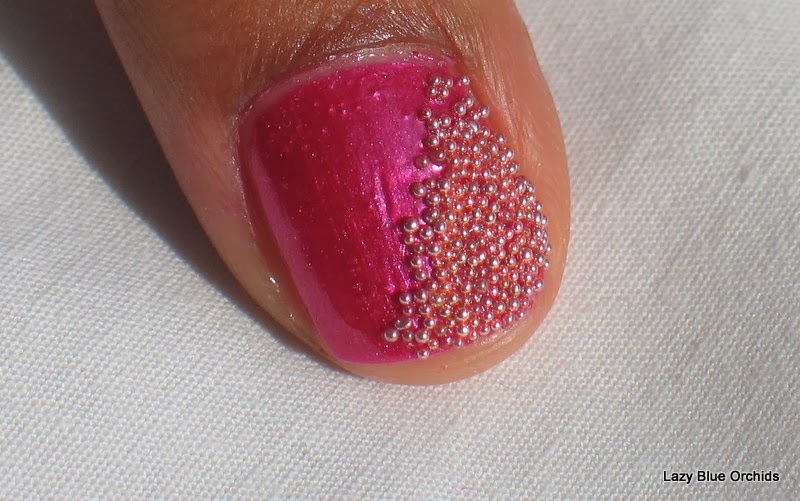
Tip: Nail caviar is not edible...but looks yummy

Tip: Use a clear top coat to adhere your nail caviar


Tip: I dip my finger in the caviar and shake off any excess. I find this is the least messy way.

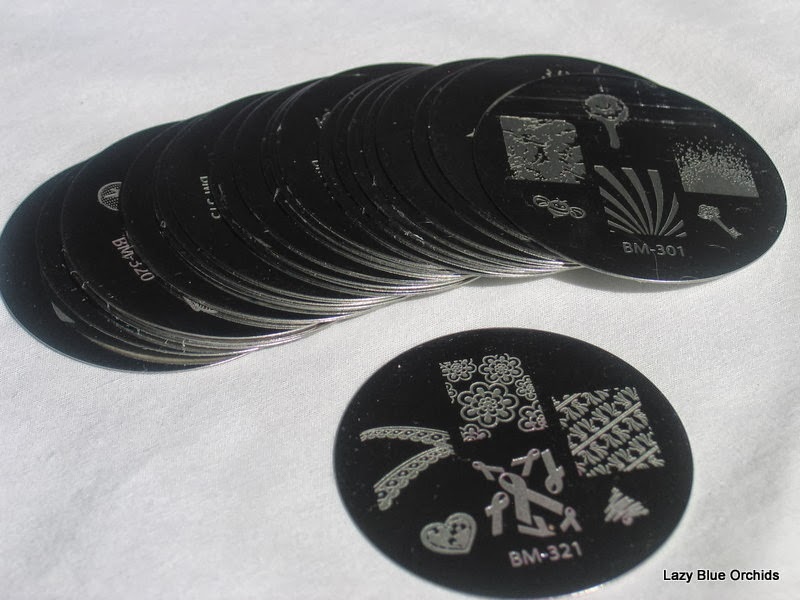
These are Bundle Monster stamping plates. You can find these on Amazon.com. One pack includes 25 plates with about 6 designs per plate. Cost around $22.00


You will need a stamper and a scraper to use your plates. This stamp and scraper are from Amazon.com for around $5.00

Tip: Make sure to use a pigmented nail polish for your stamping. Light opaque colors do not show.

Tip: Make sure to cover the entire design with nail polish then use scraper to take off the excess polish and then push your stamper on design to lift design off of the plate. (I will definitely have to do a video on this).
Tip: Clean off excess polish with Q-Tip and Acetone


 |
| Thumb |
 |
| Pointer finger |
 |
| Middle Finger |
 |
| Ring Finger |
 |
| Pinky |
What I Used
1. Clear Top Coat: Wet N Wild, Wild Shine (401A)
2. Base Coat: KleanColor (Pink Sleepers 67)
3. KleanColor (White 4) shocking name for this polish lol
4. KleanColor (Sheer Pastel Pink 148)
5. Wet N Wild (435 G)
6. Wet N Wild (435 G)
10. Nail Caviar
11. 100% Acetone and Q-Tip (Bought from CVS)
!!!PLEASE NOTE THAT HIGHLIGHTED ITEMS HAVE DIRECT LINKS ON THEM!!!
Directions
Step 1. Make sure nails are clean from any previous polish. Then paint one thin layer with your Base Coat: KleanColor (Pink Sleepers 67).
Step 2. Paint Pinky and Pointer Finger with two coats of Wet N Wild (435 G). Allow to dry between each coat of nail polish.
Step 3. Paint Thumb and Ring Finger with two coats of Wet N Wild (435 G).
Step 4. Paint Middle Finger with two coats of KleanColor (Sheer Pastel Pink 148)
Step 5. Allow all nails to fully dry.
Step 6. Paint corner of your thumb with Clear Top Coat: Wet N Wild, Wild Shine (401A). You can use a piece of striping tape to make sure you get the polish only in the desired area.
Step 7. Dip Thumb in nail caviar gently. Rub any excess caviar off with your finger and press the remaining caviar into the polish to make sure they stay.
Step 8. Paint your desired design on your nail plate with KleanColor (White 4), then using the scraper take off the excess polish.
Step 9. Press your Stamper on the design firmly to make sure to lift entire design.
Step 10. Now press the stamp onto your Ring Finger nail. (Let the design dry for a minute before applying top coat to avoid smearing...I didn't do that due to my impatience lol)
Step 11. Clean any excess polish off the edges of your fingers with a Q-Tip and Acetone.
Step 12. Apply Clear Top Coat: Wet N Wild, Wild Shine (401A) to all nails.
Voila!!!
Bye!!!
No comments:
Post a Comment